Wednesday, December 19, 2012

Gingerbread Scones

So we only have less than a week until Christmas! 


Yeah, crazy right? I'm sure you all are thinking the same thing as I am. Where did this year go? It just flew by so fast. 
Last year I was six months pregnant and we still lived in our home with no intention of moving for at least the next 5 years. Well a lot has changed within that year. It's just amazing where life takes us in such a short time. 

This week I decided to try a recipe that I've never EVER made before. Well, I've never EVER made scones before! At least not this kind of scone. It was an adventure as I followed each step exactly (since I had no idea what I was doing!) I was pleasantly surprised when they turned out so fabulously! 
I also had no idea what to expect when I tasted the first one. Were scones hard or soft? What is the texture like? Well, these scones are slightly crispy on the outside but when you bite in they're so soft! I was really surprised! They are so good I think I'm going to try out some other scone recipes. Maybe after the holidays.
I can't even explain how good these are. They taste exactly like gingerbread cookies. Ginger snaps are one of my favorite cookies too so I naturally love these scones! 
One other thing that surprised me was how simple and easy it is to make such an elegant dessert! To me they look like they'd be difficult but it really wasn't hard at all!
I can't wait for you to try these! They'd be perfect for you neighbors or just for your family. 
Let me know what you think! 


Gingerbread Scones
The Taste of Home Baking Book

2 cups all-purpose flour
3 Tbsp. brown sugar
2 tsp. baking powder
1 tsp. ground ginger
1/2 tsp. baking soda
1/2 tsp. salt
1/2 tsp. ground cinnamon
1/4 cup cold butter
1/3 cup molasses
1/4 cup milk
1 egg, separated
Sugar

1. In a large bowl, combine the flour, brown sugar, baking powder, ginger, baking soda, salt and cinnamon. Cut in the butter until mixture is crumbly. In a small bowl, combine the molasses, milk and egg yolk until smooth; stir into the crumb mixture just until moistened.
2. Turn dough onto a floured surface; knead gently 6-8 times. Pat into an 8-in. circle; cut into 12 wedges. separate wedges and place 1 in. apart on a greased baking sheet. Beat egg white until frothy; brush over scones. Sprinkle with sugar. Bake at 400 degrees for 12-15 minutes or until golden brown. Remove from pan to a wire rack. Serve warm. 

This is about how thick it should come out.

This is how round 8 inches is. 

All 12 fit onto a regular cookie sheet.
When you start to cut them out, you need to cut it into four then cut each of those into threes. Then you'll end up with 12 equal pieces. I just started cutting and some were bigger than others but they still baked about the same. I just wanted to let you know so you wouldn't make the same mistake as I did!




Thursday, December 13, 2012

Streusel Nut Topped Banana Bread

Hello everyone!
I am so excited to share my most favorite banana bread recipe! We are usually pretty good at eating all of our bananas before they get too ripe but this week we were eating too many Cuties! That's okay though, that just means Banana Bread! 
Every recipe I've tried from my Taste of Homes cook book has been super yummy. It's full of traditional recipes that are just plain good! This recipe for Banana Bread is no exception. I've been making it for a long time, and every time it turns out just as good (or better) as the last.  
So let's have a talk about the streusel topping. The streusel topping is optional but I highly recommend it! It gives your traditional (already delicious) banana bread an awesome crunch! It takes banana bread to the next level. It only takes a couple extra minutes to throw together and it's absolutely worth it. 
I hope you enjoy it! Once you make some, it won't last long. I can promise you that!


Streusel Nut Topped Banana Bread
From the Taste of Home cook book

2 cups all-purpose flour (I used half white, half whole wheat)
1 1/2 tsp. baking powder
1/2 tsp. baking soda
1/4 tsp. salt
1/4 tsp. ground cinnamon
1/8 tsp. ground nutmeg
2 eggs, beaten
1 1/2 cups mashed ripe banana (4-5 medium)
1 cup sugar (I used half white and half Splenda)
1/2 cup cooking oil or melted butter or margarine
1/4 cup walnuts (optional)
1 recipe Streusel-Nut topping (also optional but highly recommended)s

Streusel Nut Topping
1/4 cup brown sugar, packed
3 Tbsp. all-purpose flour
2 Tbsp. butter
1/3 cup chopped walnuts

1. Preheat oven to 350 degrees. Grease bottom and 1/2 inch up the sides of one 9x5 inch or two 7x3-inch loaf pans; set aside. In a large bowl combine flour, baking powder, baking soda, salt, cinnamon, and nutmeg. Make a well in center of flour mixture; set aside.
2. In a medium bowl combine eggs, banana, sugar, and oil. Add egg mixture all at once to flour mixture. Stir just until moistened (batter should be lumpy). Fold in walnuts (optional). Spoon batter into prepared pan(s). 
3. For Streusel Nut topping: In a small bowl combine brown sugar and flour. Using a pastry blender or fingers, cut in the butter until mixture resembles coarse crumbs. Stir in chopped walnuts. Sprinkle topping over batter in pan(s)
4. Bake for 55 to 60 minutes for 9x5-inch pan or 40 to 45 minutes for 7x3-inch pans or until a wooden toothpick inserted near center comes out clean. Cool in pan on a wire rack for 10 minutes. Remove from pan. Cool completely on rack. 
Get ready for this bread to be devoured!


Tuesday, December 11, 2012

Jalapeno Popper Dip

Hello everyone!
I'm sorry it's been a while since I posted a recipe. Trust me, I have many excuses and I could go on and on trying to convince myself that they were justifiable. I'm sure you don't have time to hear all about it! I'm doing a post today so let's not dwell on the past mkay? :) Alright, down to business!
 
My most favorite part about the holidays is the parties! We don't get to go to very many because we don't have very many friends, so we just throw our own Christmas bash every year on Christmas Eve. We get my husband's family and my family together and enjoy good company and of course good food! Holiday food is just amazing. That's why we all gain ten pounds, right?! Or maybe it just feels like ten pounds. Well I found the perfect dip for you to serve at your own Christmas party. Really, this dip could be served at any time of the year. The Super Bowl, New Year's Eve, Birthday's, on Sunday's, Thursday's... Okay, I think you get my point. :)
 
It is so yummy too! It's just the right amount of spicy but the good thing is that you get to control how hot it is by how many jalapenos you choose to put in and whether or not you add the seeds in too. My husband doesn't like a lot of spicy food so I just added three and that was just right for him! You just HAVE to try it! It's warm and cheesy and just plain delicious. Just what you need right now right? I wish I had some right now. :) Try it and let me know what you think!
 
 
Jalapeno Popper Dip
recipe adapted from simply-gormet.com
 
8 slices of bacon, diced and cooked until crispy
2 (8 oz.) packages of fat-free or light cream cheese, soft
1 cup mayonnaise
3 medium jalapenos (this is how many I use)
1 cup cheddar cheese, shredded
1/2 cup mozzarella cheese, shredded
1/4 cup diced green onion
 
Topping:
 
1 cup crushed crackers (I used Club Crackers)
1/2 cup parmesan cheese
1/2 stick of butter, melted
 
1. Preheat oven to 350 degrees.
2. Combine all the ingredients into a medium bowl. Stir well.
3. Transfer to an 8 in. X 8 in. or equivilant oven proof dish.
4. Combine the ingredients for the topping and sprinkle on top of the dip.
5. Bake dip for 20 - 30 minutes or until bubbly.
6. Serve immediately with your favorite dipping crackers. (We used Wheat Thins.)
Enjoy!


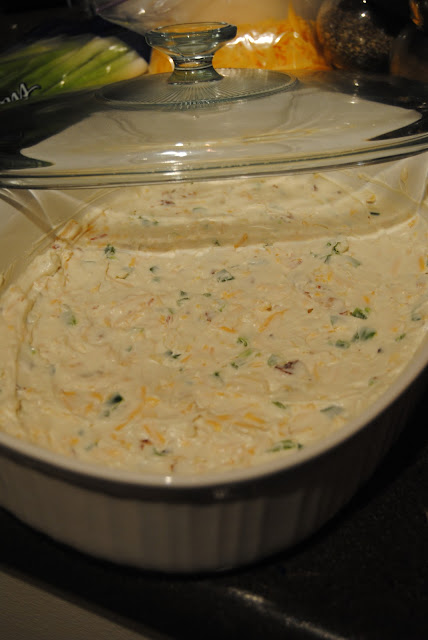
This is what it looks like without the topping on.

Friday, November 30, 2012

Poppy Seed Chicken

I think every wife/mother/woman out there (including me) is aways looking for a new recipe for chicken. I am continually getting bored with the same old chicken dishes. Well this is a recipe that you may not have tried before.
Okay okay... So I will admit. I'm kind of a casserole addict!
They're just so easy and there are too many yummy ones! So it's not my fault.
This recipe can be prepared in 20 minutes or less! Who could ask for more than that? And again, it's a casserole so it's a snap to put together and you probably already have everything you need!
After I had my baby girl, one of my sweet neighbors brought us dinner. My husband and I fell in love with it! We never got the chance to get the recipe from her before we moved. But as I was browsing my Taste of Homes Casserole book I saw this recipe. It just so happened to be the same yummy dinner our neighbor brought us! I just had to make it!
I just love the crisp poppy seeds and crunchy crackers. It really makes this dinner absolutely delicious! I hope everyone enjoys this one.


Poppy Seed Chicken
Adapted from Taste of Home Casserole Book
Serves 6

3 cup cubed cooked chicken breast
2 cans (10-3/4 oz. each) reduced-fat reduced-sodium condensed cream of chicken soup, undiluted
1 cup (8oz.) reduced-fat sour cream
2 teaspoons poppy seeds
2 cups crushed reduced-fat Club Crackers
1/4 cup reduced-fat butter, melted
1/3 cup grated Parmesan cheese
Hot cooked rice or noodles (optional)

1. In large bowl, combine the chicken, soup, sour cream and poppy seeds In a small bowl, combine cracker crumbs and butter; set aside 1 cup for topping. Stir remaining crumbs into chicken mixture.
2. Transfer to an 11-in. x 7-in. baking dish coated with cooking spray. Top with reserved crumbs; sprinkle with Parmesan cheese. Bake, uncovered, at 350 degrees for 30-35 minutes or until bubbly.
3. Serve alone or on top of hot cooked rice or noodles.


Tuesday, November 27, 2012

Greek Chicken Nachos

 
I have been a brave one lately.
 
Normally I wouldn't even give this recipe a second glance but for some reason I decided to give it a go. Guess what? It's awesome! Of course it's good; it came out of the Taste of Home Casserole book. Everything I've made in there has been super delicious!
 
The best things about a casserole is
1. You can feed your whole family. (Or eat leftovers for 3 days)
2. They're usually pretty simple to assemble.
3. You most likely already have everything you need in your fridge and cupboard.
 
This casserole has the taste and texture of regular nachos but with a Greek flair! Feta cheese, hummus, tomatoes, olives; yes please!
I hope you all will try this. Don't be intimidated! It's really simple and so so so yummy! It's so much fun trying something new! 


Greek Chicken Nachos
Adapted from Taste of Home casserole book

2 large boneless, skinless chicken breasts, marinated
2 (15 oz.) cans garbanzo beans or chickpeas, rinsed and drained
1/2 cup Italian salad dressing
4 cups coarsely crushed tortilla chips
1 (4 z.) package crumbled tomato and basil or plain feta cheese
1 cup chopped tomatoes
1 cup black olives, chopped
2 cups (8 oz) shredded part-skim mozzarella cheese

Marinade
Juice of 1 lemon or 1/4 cup lemon juice
2 Tbsp. olive oil
3 cloves garlic, minced
1 Tbsp. ground black pepper
Salt

1. Make sure chicken is thawed. In a shallow glass baking dish, combine fresh lemon juice with olive oil, garlic and black pepper. Mix together with a fork.
2. Place chicken breasts in the dish and turn several times to coat. Let mixture sit for 30 minutes.
3. After 30 minutes, sprinkle chicken breasts with salt. Cook on medium to high heat until cooked all the way through.
4. Meanwhile, place the garbanzo beans and salad dressing in a food processor; cover and process until smooth. Dice chicken. In an ungreased 13-in x 9-in. baking dish, layer half of the bean mixture, tortilla chips, chicken, feta cheese, tomatoes, olives and mozzarella cheese. Repeat the layers.
5. Bake, uncovered, at 325 degrees F for 8-10 minutes or until the cheese is melted.  


Sunday, November 25, 2012

Brownie in a Mug

I  hope everyone had a great Thanksgiving!
Ours was so great! We got to see all of our family and spend 3 whole days at home. I just love this time of year, especially the food (of course)! There's nothing like sharing the holidays with family, that's the most important thing. I'm so thankful for both my families and for all the love and support they give to us. That's what i'm most thankful for.
This recipe doesn't have anything to do with Thanksgiving other than i'm thankful that I found it! Since I found this recipe we've had it several times. I already have it memorized, that's how many times we've had it. It's turned to our go-to, last minute dessert because it's so easy and quick! It's perfect for that chocolate craving we all get from time to time but you don't have to wait an hour to make a whole pan of brownies. I added the chocolate chips because without it I felt like it was missing some sweetness, but you can try it without if you want to.
Try this dessert tonight! Your whole family will enjoy it and it's a snap to clean up after too.


Brownie in a Mug
adapted from gopromos.com

1/4 cup flour
1/4 cup sugar
1 pinch salt
2 Tbsp. baking cocoa
2 Tbsp. olive oil
3 Tbsp. water
1 palm full milk chocolate chips
Whipped topping or vanilla ice cream (optional)

1. Mix together the dry ingredients
2. Add in oil and water and mix until smooth.
3. Add in a small handful of chocolate chips and mix in.
4. Put in microwave uncovered for 1 minute and 40 seconds.
5. Let cool slightly and serve with whipped topping or vanilla ice cream
Enjoy!

Monday, November 19, 2012

Slow Cooker Chicken Taco Soup

For the most part, I really dislike winter time. Mostly because it's freezing and you have to bundle up EVERY time you go outside. Long gone are the days of going out in a short sleeve shirt. Hmm... I miss spring and summer already! The one thing I DO like about winter is all the delicious warm meals that we get to enjoy. Soups, in particular, are the best lunch and dinner when your toes are frozen!
If you make anything in your slow cooker this week, it has to be this soup!
Dinner cannot get any simpler than this. This is my go-to recipe that I've made over and over again. My husband gets so excited when I made this soup and I get so excited because it's so easy! 
Most of the ingredients are probably in your pantry right now.
So let's get cooking! 


Slow Cooker Chicken Taco Soup
Adapted from allrecipies.com

1 onion, chopped
1 (16 oz.) can kidney beans
1 (15 oz.) can black beans
1 (15 oz.) can whole kernel corn,drained
1 (8 oz.) can tomato sauce
1 1/2 cups water
2 (4 oz.) cans diced green chilies
1 (15 oz.) can diced tomatoes
1 (1.25 oz.) package taco seasoning
3 boneless, skinless chicken breasts
Shredded cheddar cheese (optional)
Sour cream (optional)
Crushed tortilla chips (optional)

1. Place the onion, kidney beans, black beans, corn, tomato sauce, water, green chilies and diced tomatoes in a slow cooker. Add taco seasoning and stir to blend. Lay chicken breasts on top of the mixture, pressing down slightly until just covered by the other ingredients. Set slow cooker on low heat, cover and cook for 5 hours.
2. Remove chicken breasts from the soup and allow to cool long enough to be handled. Stir the shredded chicken back into the soup and continue cooking for 2 hours. Serve topped with shredded cheddar cheese, a dollop of sour cream, and crushed tortilla chips if desired.

Thursday, November 8, 2012

Pumpkin Pie Pancakes


I love fall!
The beautifully colored leaves, the jacket weather and most of all we get to indulge in pumpkin!! If this delightful pumpkin recipe doesn't get you in the mood for Thanksgiving, then I don't know what will. We made them for dinner last night and I had the leftovers for lunch! I can still taste pumpkin pie in my mouth. Mmmm...
Another cool thing about this recipe is that it's a family recipe handed down from my great grandmother! Its original title is Feather Pancakes, I just added in the pumpkin and spices. So literally this recipe is one of the best homemade pancake recipes out there! Trust me; it's the only pancakes I've made... ever!
Making your pancakes from scratch is really easy too! Maybe not quite as easy as opening a bag and dumping out a pre-made mix into a bowl but they still are really easy. I'm sure it only takes a few more minutes to whip up a batch of home made batter. That way you know exactly what is going into your mix! Cooking from scratch give me peace of mind. :) I can't wait for you to try these!

Pumpkin Pie Pancakes

1 cup Milk
1 Egg
2 Tbsp. Oil
3/4 cup Pumpkin Puree
1/4 cup Water

1 cup Flour
2 Tbsp. Sugar
2 Tbsp. Baking Powder
1/2 tsp. Salt
1/4 tsp. Ground Cinnamon
1/8 tsp. Ground Ginger
1/8 tsp. Ground Cloves
Chopped Walnuts (optional)
Fat Free whipped topping (optional)

1. Mix together milk, egg, oil, pumpkin puree and water until smooth.
2. In a separate bowl mix flour, sugar, baking powder, salt and spices. Gradually add dry ingredients to the wet ingredients.
3. Spoon onto hot oiled griddle. Brown on both sides.
4. Serve with a dollop of whipped topping and sprinkle with nuts, if desired.

Makes 6-8 medium pancakes.

Wednesday, November 7, 2012

WINTER DAY DINNER

Well, Fall is here and Winter is coming whether we like it or not! This dinner is perfect for this time of the year. My husband LOVES potatoes and cheese sauce, which is why he loves this dish so much! It's really easy to put together and it's pretty quick too if your husband will pitch in and help you like mine did. :) Make this once and it will become an instant favorite!


Winter Day Dinner
Adapted from Taste of Home
 
1 pound groud beef
1 medium yellow onion
2 Tbsp. Worcestershire sauce
1 tsp. salt
1/2 tsp. pepper
8 medium potatoes, sliced
1 (15 oz.) can corn
 
Cheese sauce:
1/4 cup butter, cubed
1/3 cup all-purpose flour
1/2 tsp. salt
1/4 tsp. pepper
2 cups milk
4 oz. process cheese (velveeta), cubed
 
1. In a large skillet, cook the beef and onion over medium heat until the beef is no loner pink; drain. Stir in the Worcestershire sauce, salt and pepper.
2. In a greased 13 x 9 baking dish, layer half of the potatoes, all of the meat mixture and corn and remaining potatoes; set aside.
3. In a large saucepan, melt butter over medium heat. Stir in flour, salt and pepper until smooth. Gradually stir in milk. Bring to a boil; cook and stir for 2 minutes or until thickened. Stir in cheese until melted. Pour over the potatoes.
4. Cover and bake at 350 degrees F for 1 1/2 hours or until the potatoes are tender.
 
 
I really hope you love this recipe jusy as much as we do. Enjoy!!

Wednesday, October 31, 2012

Spanish Chicken & Potato Roast


This is a beautiful dish for a bargain! 
Buying chicken thighs can save so much money. I bought a package at Smith's for $5! That would feed a family of four easily. The seasoning is so simple but it has such a wonderful flavor! It's amazing what a few ordinary ingredients will do for chicken and potatoes. Paired with a green salad, it's the perfect Sunday meal!


Spanish Chicken & Potato Roast
Recipe adapted from foodnetwork.com

1 1/2 lbs. large Yukon gold potatoes, cut into 1 1/2 inch pieces
4 cloves garlic, smashed and coarsely chopped
2 Tbsp. extra-virgin olive oil
Kosher salt
1 1/2 lbs. skinless, boneless chicken thighs (5 to 6 pieces)
2 tsp. smoked paprika
Freshly smoked pepper
4 Tbsp. roughly chopped fresh parsley or 4 tsp. dry parsley
1 lemon, juiced
2 large or 3 medium red onions, halved and thinly sliced

Position a rack in the upper third of the oven. Place a large cast-iron baking dish or a rimmed baking sheet on the rack and preheat to 500 degrees F. Put the potatoes, garlic, olive oil, 1 tablespoon water and 1/2 teaspoon salt in a large microwave-safe baking dish and toss to coat. Cover with plastic wrap, pierce the plastic in a few places with a knife and microwave 8 minutes to partially cook.

Meanwhile, pat the chicken dry and transfer to a bowl. Sprinkle with the paprika, 1 teaspoon salt and 1/2 teaspoon pepper. Add 2 tablespoons parsley (or 2 tsp. dried) and the lemon juice; toss to coat. Set aside.

Remove the hot baking dish from the oven; carefully add the potatoes and spread in an even layer. Scatter the onions on top. Roast until the potatoes start to brown, about 12 minutes.

Flip the potatoes and lay the chicken pieces on top, adding any accumulated juices from the bowl; return to the oven and roast until the potatoes are tender and the chicken is cooked through, about 12 more minutes. Remove from the oven and top with the remaining 2 tablespoons fresh parsley (or 2 tsp. dried).


Preparing the chicken.
Adding the chicken with the potatoes and onions.

Friday, October 26, 2012

Summer Veggie & Beef Saute

Hello Readers!
I have taken a huge break from blogging. A lot has happened in our life and I think things have settled down enough now to where I can get back into it. We just recently moved three hours away from our home and families. It was pretty drastic and we are really sad we had to go but I think this will be a big learning experience for us. Sometimes you just have to take a risk and hope that you are making the right decision. We think we are! My husband is going back to school and we really believe it will help make our life better in the long run. So, wish us luck that the next two years will go by extremely fast! Thanks :)
 
Now, to my recipe. This is one of those dinners that is so versatile. Basically, if you have ground beef in your freezer and some veggies, you can make this dinner! This time I used onion, broccoli, yellow squash and zucchini. You could easily through in a tomato, green onion, mushrooms, peas, carrots, or whatever else floats your boat! Also, as far as I know this recipe is original. My mom is one of those people that just throws things together and they turn out delicious! So I owe this one all to her.


Summer Veggie & Beef Saute
Serves 2-4
 
2 Tbsp. Olive Oil
1 medium Yellow Onion, chopped
1 Tbsp. chopped Garlic
1 lb. Ground Beef
2 small Zucchini, sliced and halved
1 small Yellow Squash, sliced and halved
2 cups Broccoli
Salt and Pepper to taste
Sour cream (optional)
 
1. Heat olive oil in large pan. Add garlic and chopped onion. Saute until onion is transparent.
2. Add ground beef and brown.
3. Meanwhile, steam vegetables until tender.
4. Add vegetables to the beef mixture and stir until combined.
5. Salt and pepper to taste.
6. Serve with sour cream on top. It's delicious!
 
 
Please feel free to comment or leave suggestions below. Thanks!


Friday, August 3, 2012

Peanut Butter Cookies

If you love Peanut Butter as much as I do (and oh, do I love it!). 
Then you'll die over these Peanut Butter Cookies from the Better Homes & Gardens cookbook! 

They're so soft and moist and so ADDICTING! 
My advice is to make sure you put them in a plastic container or they might lose their moist goodness! 
~And as always, serve with a cold glass of milk~


Peanut Butter Cookies
 
Ingredients:
1/2 cup butter, softened
1/2 cup creamy peanut butter
1/2 cup granulated sugar
1/2 cup packed brown sugar
1/2 teaspoon baking soda
1/2 teaspoon baking powder
1 egg
1/2 teaspoon vanilla
1 1/4 cups all-purpose flour

Directions:
1. Beat butter and peanut butter with an electric mixer or stand mixer with the paddle attachment on medium to high speed for 30 seconds. 
2. Add the granulated sugar, brown sugar, baking soda, and baking powder. Beat until combined, scraping sides of bowl. 
3. Beat in the egg and vanilla until combined. 
4. Beat in as much of the flour as you can with the mixer. stir in remaining flour. If necessary, cover and chill dough until easy to handle (about 20 minutes).
5. Preheat over to 375 degrees F. Shape dough into 1-inch balls. roll balls in additional granulated sugar to coat. Place balls 2 inches apart on an ungreased cookie sheet (they spread a little). Flatten by making crisscross marks with a fork. Bake for 7-9 minutes or until bottoms are light brown. transfer to a wire rack and let cool.
6. Once cooled, store in an air tight container for up to a week. (But they won't last that long anyway :)

*This post/recipe is dedicated to my Grandma VanWagoner. She is the most beautiful and wonderful grandma in the whole world. I think the reason why I love these cookies so much is because they remind me of her. She always has a cookie jar out on the counter filled with cookies, but the cookies I remember best were her Peanut Butter Cookies. Thank you Grandma for all you've done in your life to get me where I am today!

Thursday, August 2, 2012

Beef & Bean Taco Casserole

I just LOVE dinners like this one!
Where there are only a few steps and it doesn't take all night to put together!
 I guess that's the beauty of a casserole and I appreciate it very much. 
I also had all the ingredients on hand, so you probably will too! 
I found this recipe on Pinterest {Love it} and it comes from Recipe.com which is such a great website! 
This is a really fun way to enjoy a taco without eating a boring old taco. I also added avocado and used a orange bell pepper to give it a little sweet note. The beauty of this recipe is that you can use as many vegetables as you'd like! 
You just might need a larger dish :)
Here are all the ingredients you'll be needing.

Layering the ingredients in the dish.

Final product. YUM! 

Beef & Bean Taco Casserole

Ingredients:
1 pound Lean Ground Beef
1 can (16 oz.) Vegetarian Refried Beans
2 Cups Salsa
1 package Taco Seasoning (or to taste)
1/2 medium Bell Pepper, Chopped (3/4 cup)
4 medium Green Onions, chopped (1/4 cup)
1 medium fresh tomato
1 can(15 oz.) Petite Diced tomatoes
1 Cup shredded cheddar or Monterey Jack cheese
1 can (15 oz.) Olives, sliced
1 Cup shredded lettuce
1 medium-large Avocado
Tortilla Chips, coarsley broken (optional)

Directions:
1. Heat oven to 350 degrees F. In a skillet, cook beef over medium-high heat 5-7 minutes, stirring occasionally, until thoroughly cooked, drain. Stir in refried beans, salsa, and taco seasoning. reduce heat to medium. Heat through, stirring occasionally.
2. In an ungreased 2 quart casserole dish, spread beef mixture. Sprinkle with bell pepper, onions, canned petite diced tomatoes, cheese and olives.
3. Bake uncovered for 20-30 minutes or until hot and bubbly and cheese is melted. Top baked casserole with lettuce, chopped fresh tomato and avocado. Optional: Top with broken tortilla chips.

Enjoy!

Monday, February 27, 2012

Chocolate-Drizzled Cherry Bars


So this is my first blog entry for my new cooking/baking blog! I'm so excited to share recipes that I've found, tested and tasted! I hope my comments will make you want to try the same recipes (if they turn out good).
This recipe is from a cook book my Mother-in-law gave to me called The Taste Of Home Baking Book. This cookbook is so amazing! It has everything baking in it. I will probably use this cookbook quite often.
I've left notes within the recipe that I thought would help this dish be better. They are marked with an * sign.

Chocolate-Drizzled Cherry Bars
Prep: 15 min.
Bake: 35 min.
Yeild: 3 dozen


2 Cups all purpose flour
2 Cups quick cooking oats
1-1/2 Cups sugar
1-1/4 Cups butter, softened
1 Can (21 oz.) Cherry pie filling
1 teaspoon almond extract

1/4 Cup semisweet chocolate chips
3/4 teaspoon shortening

1. In a mixing bowl, combine flour, oats, sugar and butter until crumbly, set aside 1-1/2 cups. * I would actually set aside 2 cups. the crust came out thick and the topping was too thin with just saving 1-1/2 cups.* Press remaining crumb mixture into an ungreased 13-in. x 9-in. x 2-in. baking dish. Bake at 350 degrees for 15 - 18 minutes or until edges begin to brown. *This picture shows me putting the crust up on the sides of the pan. DO NOT DO THIS! I wished I hadn't. Make a slight incline up the side to keep the cherries in but that's it. It will turn out better.*


2. In a bowl, combine pie filling and extract; carefully spread over crust. Sprinkle with reserved crumb mixture.
3. Bake 20 - 25 minutes longer or until edges and topping are lightly browned. In a microwave or heavy saucepan,*I used the microwave.* melt chocolate chips and shortening; stir until smooth. Drizzle over warm bars. *use a spoon or if you want to be fancy, put chocolate in a Ziplock back with one corner cut out and pipe on the chocolate.* Cool completely on a wire rack.
This recipe turned out so good! I am highly recommending it to everyone I know. I took this over to my in-laws house for Sunday dinner and it was a hit! You could also serve it with some vanilla ice cream or whipped topping on top!
Enjoy!